After trawling Amazon for the 100th time in the hopes of satisfying the need to find a gift for some obscure relative, why not leaven your experience with a little 'Tip Aperitif’; a perfect little pallet cleanser to keep you going for the duration of the festive season. Visit us over the coming days to reveal a new quick tip that will make life on your Mac or iPhone just that little bit easier. It’s a tech advent calendar of sorts!
Day One - Back Tap
SHOWHIDE
A little known iPhone Accesibility option allows you to assign a function to either a double or triple tap of the back of your iPhone. I personally use the triple tap to turn on the torch, however there are many options that include enabling the App Switcher, Locking Rotation, taking a Screenshot or turning the Volume Up or Down. You can even go as far as enabling a shortcut built in the Shortcuts app which will let you complete a whole sequence of commands, effectively making it’s usefulness limitless!
To assign a function to back tap:
- Go to Settings.
- Select Accessibility > Touch > Back Tap.
- Choose either Double Tap or Triple Tap.
- Select the option you wish to assign.
Day Two - Ask Siri to Spell Something
SHOWHIDE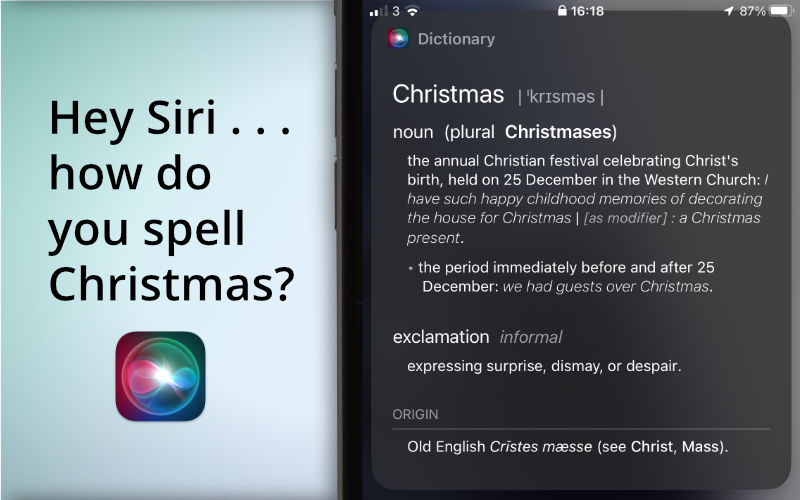
Ever find yourself in a bit of a jam when writing and can’t remember how to spell a word. Ask Siri and the virtual assistant will spell it out for you with an onscreen note showing you the word as well. You can take this a step further. There are times when I am writing a text and both my own spelling and auto correct fail to give me the word I actually want. Step in dictation (powered by Siri) to come to the rescue, supplying the correct spelling for that word you were struggling with.
To ask Siri to spell a word for you:
- Tap the Siri icon or say ‘Hey Siri . . .’
- When the Siri readiness sound is heard say ‘How do you spell my word ?’ Or ‘Spell my word’.
To use dictation:
- Use the dictation key (microphone in a cradle icon). On iPhone/iPad this is on the left of the space bar in the on-screen keyboard. On Mac it may be a dedicated key (newer Apple Silicon machines) or double press the Function (fn) or Control (ctrl) key, however this shortcut can be user configured in System Preferences/Settings.
- Say ‘My Word’.
Day Three - Mac Application Switcher
SHOWHIDE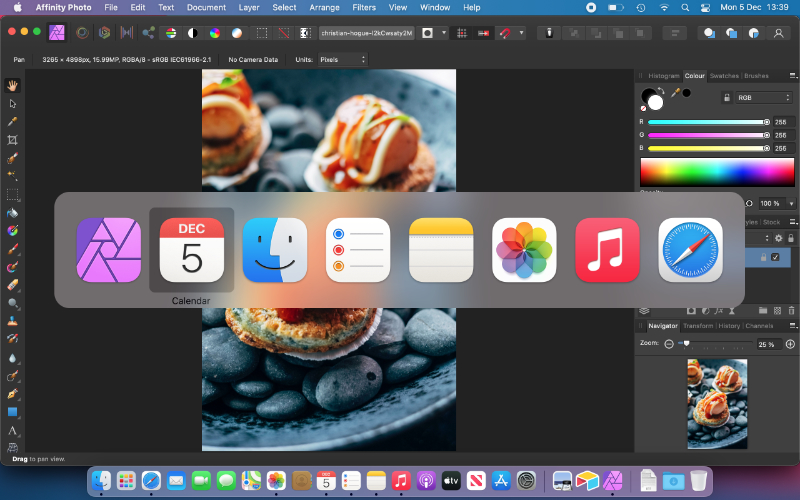
Macs have a built in Application Switcher. You can access the switcher by pressing and holding the ⌘ (Command) key followed by the ⇥ (Tab) key. You can use the switcher to do various things as listed bellow.
Navigate to an Open App
Whilst keeping the ⌘ (Command) key held down, pressing ⇥ (Tab) multiple times moves right through the list of open applications. Let go when you are over the app that you wan’t to switch to. Pressing ⇧ + ⇥ (Shift + Tab) moves to the left. You can also use the arrow keys or the mouse to navigate between them.
Quit or Hide an App
Whilst keeping the ⌘ (Command) key held down navigate to the app you wish to quit or hide and press either Q for quit or H for hide.
Open Exposé for the Selected App
If you wish to see and select the multiple open windows for any particular app then press the ↑ (Up Arrow) key when over that application’s icon. This will open App Exposé for that application and you can now let go of the ⌘ (Command) key. From here you can navigate the windows using the arrow keys and mouse or type the first few letters of the windows name. Pressing enter selects that window, pressing escape exits Exposé.
Day Four - Text Navigation Shortcuts
SHOWHIDEWhen interacting with text on the Mac you can quickly and easily navigate between words, lines and paragraphs using a few shortcuts. Combining the ⇧ (Shift) key with any of the navigation commands performs a selection of those characters as well.
- ⌥ + ← (Option + Left Arrow) - Move back one word.
- ⌥ + → (Option + Right Arrow) - Move Forward one word.
- ⌘ + ← (Command + Left Arrow) - Move to the beginning of the line.
- ⌘ + → (Command + Right Arrow) - Move to the end of the line.
- ⌥ + ↑ (Option + Up Arrow) - Move to the beginning of the paragraph.
- ⌥ + ↓ (Option + Down Arrow) - Move to the end of the paragraph.
- ⌘ + ↑ (Command + Up Arrow) - Move to the beginning of the document.
- ⌘ + ↓ (Command + Down Arrow) - Move to the end of the document.
And finally you can easily delete from your current insertion point to the end of the paragraph using the ⌃ + K (Control + K) shortcut.
Day Five - Open System Preferences (Settings) Quickly
SHOWHIDE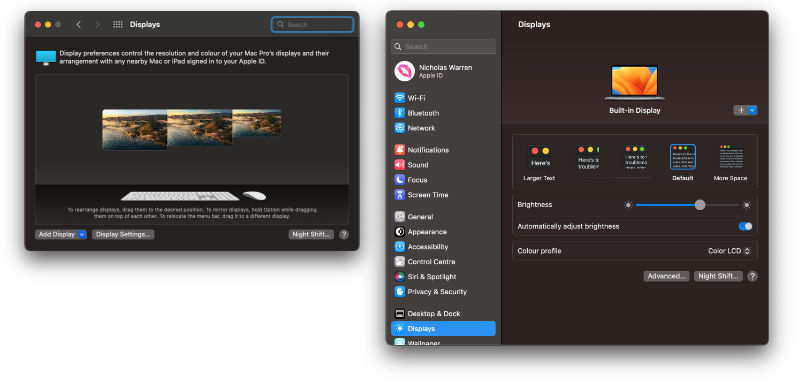
System Preferences (redesigned and renamed System Settings in MacOS Ventura) is the place to go when we need to change a system wide setting. When you need to get to it quickly it’s great to be able to use a shortcut, however there isn’t a shortcut to open System Preferences itself there are shortcuts that will open a specific pane.
In order to invoke the shortcut for one of the panes you simply need to hold down the ⌥ (Option) key and then press the corresponding function key and the relevant System Preference pane will open. For example holding ⌥ (Option) and 🔆 (the Screen Brightness Up function key) opens the Display System Preferences pane. From here the rest of System Preferences are a few short clicks away.
Setting a Shortcut for System Preferences Itself
You can use the App Shortcuts function to add a shortcut to System Preferences. We would suggest the combination ⇧ + ⌘ + , (Shift + Command + Comma), as it feels a logical progression from the system wide application preference shortcut of ⌘ + , (Command + Comma). To find out more about setting App Shortcuts check out our Mac Automation Series.
Day Six - Change Photos or Music Libraries
SHOWHIDE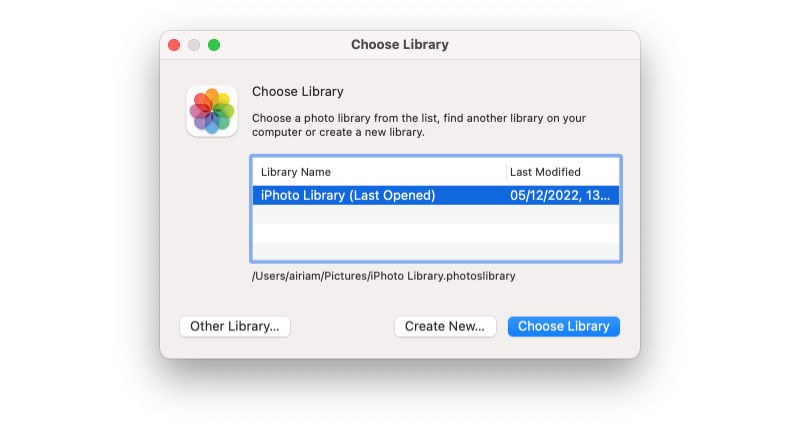
Did you know that you can have more than one library for both the Photos and Music apps? The library file is a special kind of folder called a container and this is where Photos and Music store all of their related files as playlists, albums and settings, and it’s also where Photos stores the imported images by default. Therefore it may be useful to sometimes have separate libraries for different uses, such as a work photo library and a home photo library.
How to Change or Create a Library
- Hold down the ⌥ (Option) Key.
- Click the Photos or Music icon on the dock or double click the app in the Applications folder.
- In the window that launches select the library you wish to use or click the create new library button to make a new one.
Day Seven - Navigate the Menu Bar and Dock Using the Keyboard
SHOWHIDESometimes it’s nice to be able to keep your hands on the keyboard for every task, however some parts of the OS feel as if they can only be interacted with by using the mouse. That’s not always the case, there are some keyboard shortcuts which allow you to access the Dock and Menu bar. Once activated it’s a case of using the navigation keys to move between menus and sub menus, enter to select a menu item and esc to exit.
Shortcuts to Access the Interface Elements
- Control + F2 (Control + Fn + F2) - Access the MenuBar menus, starting with the Apple Menu.
- Control + F3 (control + Fn + F3) - Access the Dock.
- Control + F8 (control + Fn + F8) - Access the Menu Bar Status Items (Changes since Big Sur make this less effective).
- Fn + C - Open the Control Centre (Opens only, no navigation).
- Fn + N - Open the Notification Centre (Opens only, no navigation).
Function Keys
The function keys on a Mac are mapped to various system specific tasks such as changing the screen brightness or adjusting the volume. In this default state you will need to press the Fn key in combination with the other keys in the shortcut. If you want to change this default behaviour and have them act as standard function keys you can do so in System Preferences> Keyboard and check the option for “Use F1, F2, etc. keys as standard function keys on external keyboards”.
Day Eight - Duplicate a Safari Browser Window
SHOWHIDEEver found yourself needing to duplicate the contents of a website that you have visited? I know I have, it’s super useful sometimes if you want to retain the results of a particular search but also want to tweak the results with some different filters as it means you don’t have to start the whole process again. Thankfully there is a simple command to do this in Safari and it’s found under the Window Menu as Duplicate Tab. There are also some other useful commands there for navigating between your open tabs. ⌃ + ⇥ (Control + Tab) to move forward to the next tab and ⌃ + ⇧ + ⇥ (Control + Shift + Tab) to move backwards.
Day Nine - Open Recently Closed Tabs in Safari
SHOWHIDE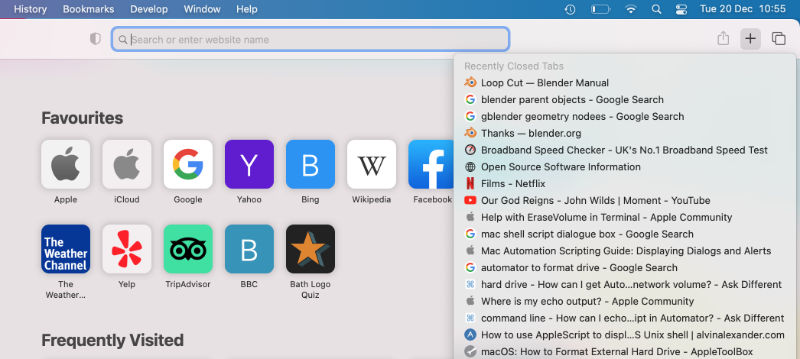
On numerous occasions I’ve closed a Safari tab only to realise it would be super useful to have it still open.It’s actually quite easy to do and there are two methods you can employ to achieve it.
Method 1
- Under the History menu select Recently Closed.
- A list of the most recently closed tabs is listed in a sub menu. Select the one that you wish to open.
Method 2
- Click and hold the little + icon for adding a new tab.
- A list of the recently closed tabs will appear, move down the list and select the one you require.
Opening Recently Closed Tabs on iOS and iPadOS
The same result can be acheived on your iPhone and iPad by clicking the Tab icon in the right of the Safari tool strip and then long pressing on the + icon. The result is a pop up list of recently closed tabs, tap one to reinstate it.
Day Ten - View the File Path to the Current Folder
SHOWHIDE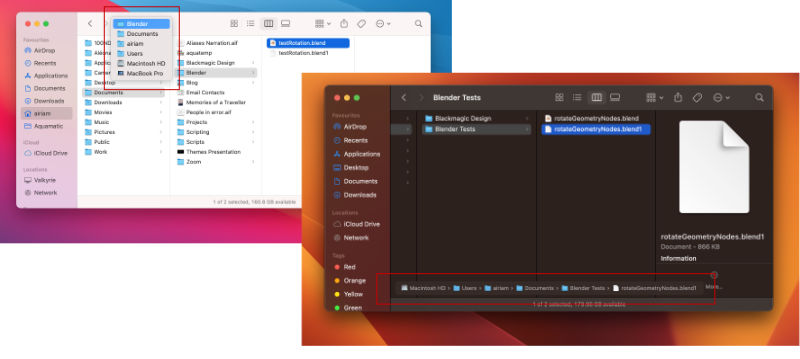
Often we can open a Finder window directly to view it’s contents but not know where the file is in relation to the file system. It’s actually very easy to do, and since the release of Monterey it’s even easier.
On All Versions of MacOS
- In the Finder window locate the name of the current folder at the top of the pane.
- ⌘ (Command) Click on the name of the folder.
- A pop up list of the enclosing folders appears showing you the relationship of the current folder to the system.
- If you wish to navigate out to one of the enclosing folders select it from the list.
On MacOS Monterey and Later
- In the finder window select the file you wish to know the path of and press the ⌥ (Option) key.
- An overlay will appear at the bottom left of the window showing the enclosing folders.
- If you wish to navigate to one of the enclosing folders select it from the path.
- Right clicking over an enclosing folder of the file itself gives you the option to copy the file path to the selected item.
Day Eleven - Customise Preview Options
SHOWHIDE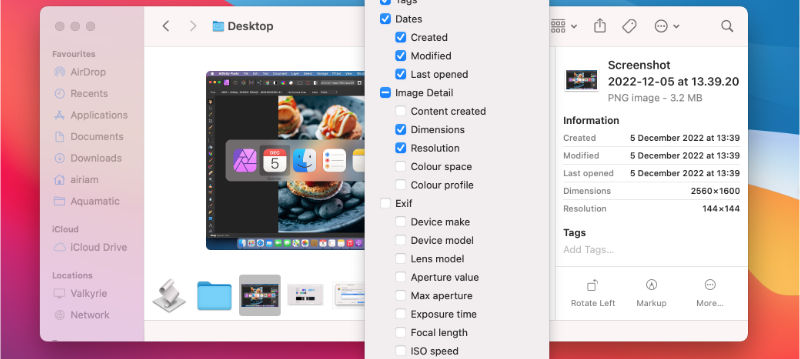
In Mojave Apple debuted a new way of showing information about a selected file, which they call Preview Options. These options can be customised for each different file type on the system. This is useful when there is some information that you may want to see about a file at a glance such as the colour space of an image or the codec of a video file. Again there are a couple of different methods for changing the options.
Method 1
- Select a file type that you want to change the view options for.
- Navigate to the View > Show Preview Options menu.
- Tick the boxes of the relevant information from the pane that appears.
Method 2
- Select a file type that you want to change the view options for.
- Right click the file and choose Show Preview Options from the resulting contextual menu.
- Tick the boxes of the relevant information from the pane that appears.
Day Twelve - Create a PDF of Any Printable Item
SHOWHIDE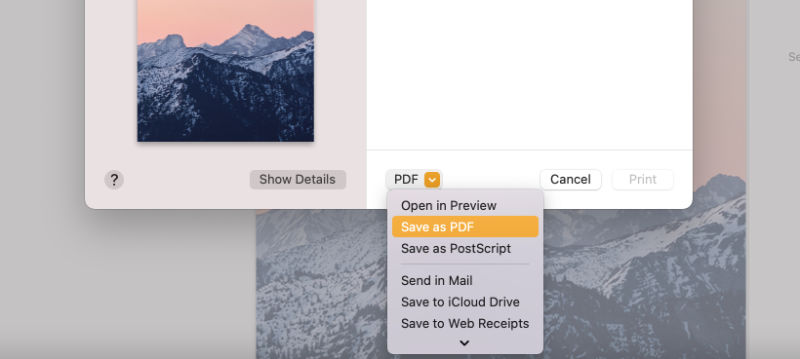
The Portable Document Format (PDF) is highly integrated into MacOS and as such it’s very easy to create a PDF from most applications by accessing the Print dialogue box.
Create a PDF
- In the application with the document or window (such as a web page) that you wish to create a PDF from select the File > Print option or use the short cut ⌘ + P (Command + P).
- In the print dialogue box locate the PDF button in the bottom left hand corner.
- There are several options in the resulting pop up menu that you may want to explore but the one we are interested in is Save as PDF.
- In the resulting sheet choose a location and name for the PDF you wish to create.
- You can optionally add a Title, Author, Subject and Keywords.
- Click Save to create the new PDF.

