You have an external drive that needs to be formated for use with the mac. It may be a USB stick or a small backup drive. A large desktop drive or a small portable one. Either way it's unlikely that it has come ready for use with the Mac.
How to Format Your Drive
Every Mac ships with a small program called disk utility, amongst other things, one of it's primary uses is to format and partition drives. Read on to find instructions on how to do this often required process.
Drive Formatting Instructions
Follow these steps to quickly format a drive. To find out more information about the steps read the more detailed explanation below.
- Launch Disk Utility.
- Select the top level of the drive you wish to format from the list of connected drives.
- Click Erase from the toolbar or use the shortcut ⇧ + ⌘ + E.
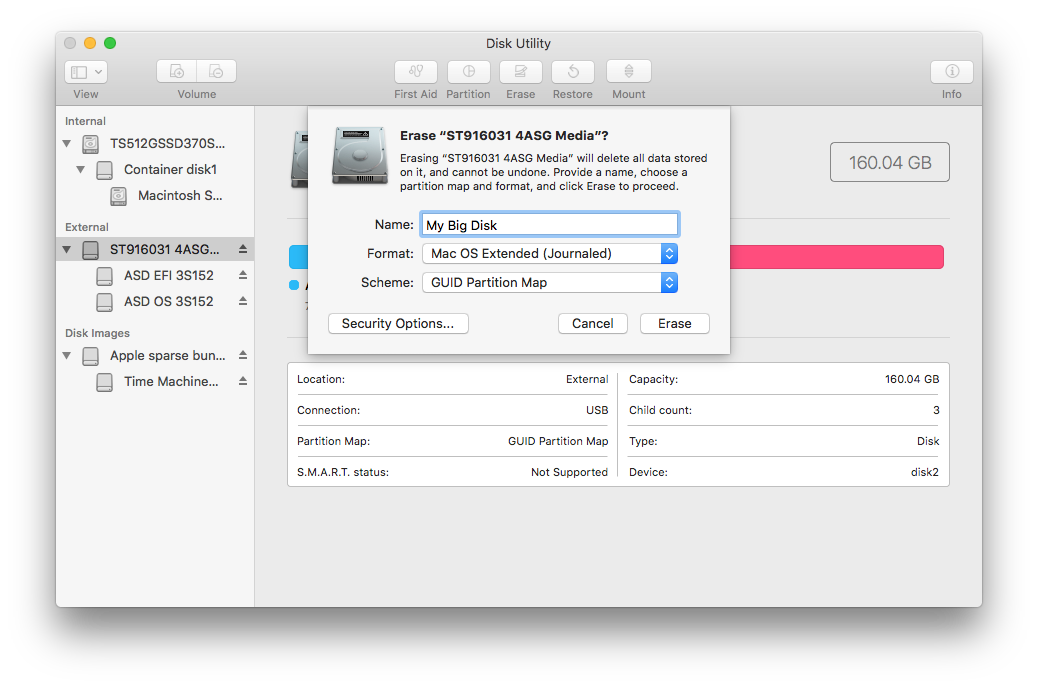
- Give the drive an appropriate Name, choose Mac OS Extended (or an appropriate file system for your use), and choose GUID Partition Map for the Scheme.
- Click Erase.
- Once the Erase sheet has closed your drive is now formatted and ready for use.
File Systems
Before we get into how to actually format the drives we need to understand a little bit about file systems. A file system is best described as a strategy or set of rules for how files will be stored on a disk. There are many file systems out there and all have been developed for a certain platform at one time or another. Sometimes when newer technologies and techniques have been developed a company may form a new file system in order to take advantage of the benefits of progressions in the field (such is the case for Apple's APFS or Microsoft's NTFS).
Not all platforms can understand all file systems. A Mac for instance can read files stored on an NTFS formatted disk but can not write to them. It's important to make sure that you are selecting the correct file system for the use that you have. On a Mac you have the following options:
- APFS
- Mac OS Extended (Journaled)
- MS DOS (FAT)
- ExFAT
Quick-Tip
Both APFS and OS X Extended give you options for Encrypted, Case Sensitive and Case Sensitive Encrypted. All of these options are there for specific use cases, but it's recommend not to use them for the most part unless you know exactly what you are doing.
With High Sierra Apple released a new File System called APFS. It's a newer more modern file system specifically designed with SSD technology in mind. With the subsequent releases of the OS full support has been included and now it is the primary File System to use with a Mac.
Schemes
In addition to the file system there is a scheme that is used to partition the drive. A partition is as it sounds, a section of the drive that has been set aside for use to store data. A drive can have multiple partitions or as is most common one partition that takes up the entire capacity of the drive. The different systems require a different scheme if they wish to use the drive.
What is a Volume
A formated partition may also be called a Volume.
The main thing to remember is that modern Macs use the GUID Partition Map. Microsoft machines use the Master Boot Record. Finally the legacy Apple Partition Map is for use with older pre OS X Mac's (Machines made before 2000).
Launching Disk Utility
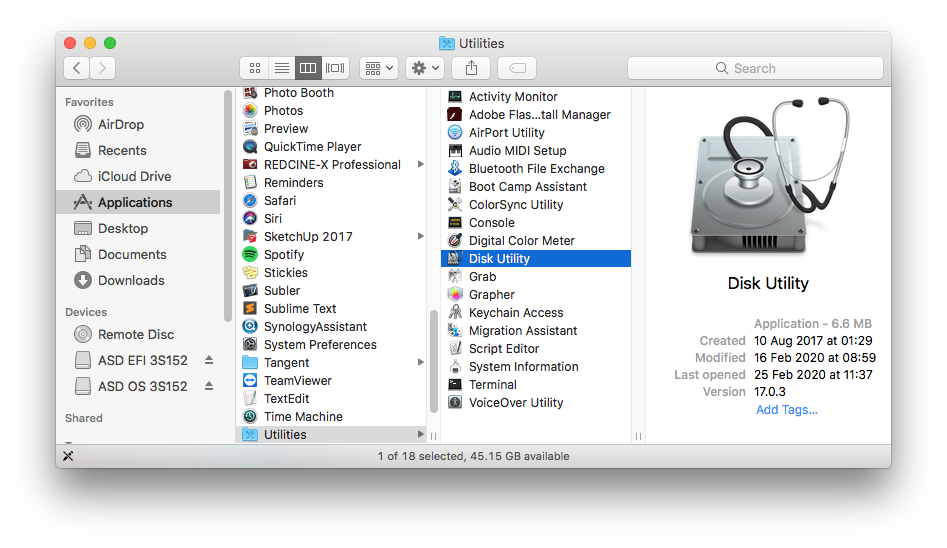
Disk Utility is found inside the Applications>Utilities folder. To get to it you can use the Finder. Select Applications from the Favourites section of the side bar and then scroll down and select the Utilities folder. Alternatively select Utilities from the Go menu or use the shortcut ⇧ + ⌘ + U. Once inside the Utilities folder select the Disk Utility application and double click it.

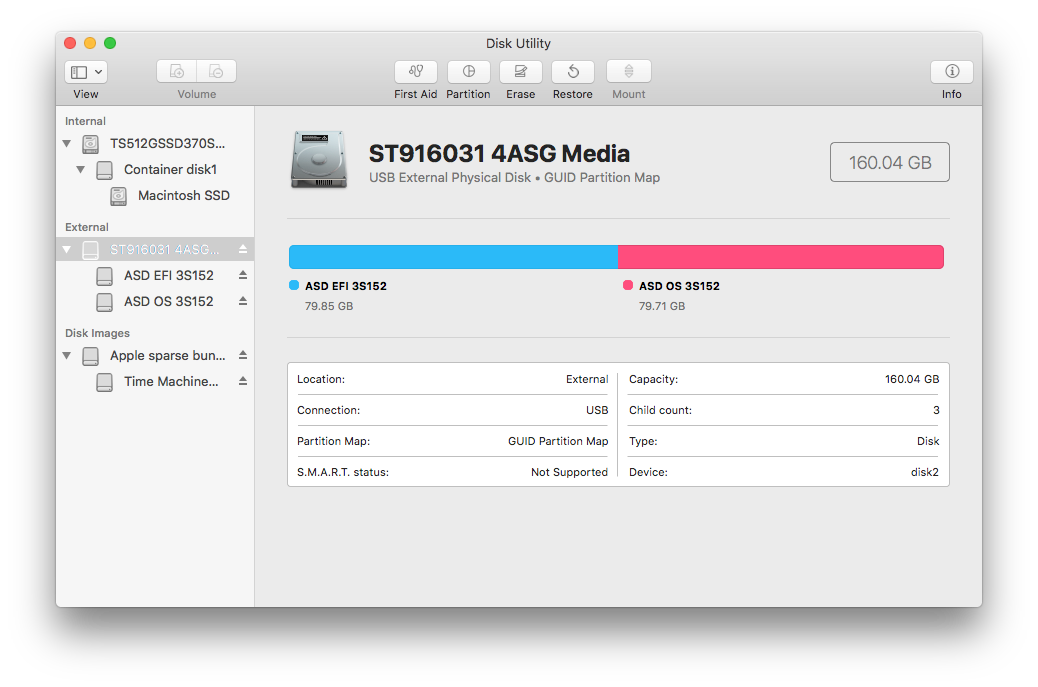
The Disk Utility window is split into three sections. The Toolbar runs across the top. The list of connected drives is to the left and the information about the currently selected drive/partition is displayed on the right.
The List of connected drives has three sections that may be visible depending on what is mounted to the machine. You will almost always have an item visible under Internal, usually named Macintosh HD. If you have a drive that you are attaching to the system (usually the case if you are needing to format a drive) it will be displayed under External. If you have a Disk Image mounted (such as when you are installing software) then it will be listed under Disk Images.
View the Entire Disk Hierarchy
By default Disk Utility only displays the Volumes that are available in the list of mounted drives. A Volume is the formated partition that is ready for use. If you want to see further up the chain to the disk itself including any container disks then you can choose View>Show All Devices or use the shortcut ⌘ + 2

The information displayed about the currently selected volume tells you the Name, File System, Capacity and usage of the drive. This is useful if you want to get a quick idea of what the drive is as well as helping you to identify the disk that you wish to deal with.
To erase the drive that you want to use, select it from the list of available Volumes and click Erase on the toolbar or use the shortcut ⇧ + ⌘ + E. The Erase sheet will appear.

Here is where we configure the settings that we require for the drive. Choose a name in order to easily identify the new drive when it is mounted to your system, by default the Mac will populate this with Untitled. Next choose the Format (File System) that you wish to use. Most of the time it's safest to use Mac OS X Extended Journaled as support for APFS is still limited to the newer OS's, this will ensure that the drive is readable on as many Mac systems as possible. Next choose the Scheme - always choose GUID Partition Map unless you have been instructed to do otherwise. Next click Erase to begin the process of wiping the drive and applying the requested settings. Please be aware that this process removes any data that was previously stored on the drive, if there are files you require make sure that you have made a copy elsewhere before continuing.
Once the Erase process has been completed click Done. Your drive is now mounted to the file system with the new format and ready for use.
What to do if the Erase Fails
Sometimes you may find that the erase process fails (the erase sheet will tell you if this is the case). If this happens try again. If you continue to get issue erasing the drive, it may be an indication that there is a fault with the drive. If this happens it's best to discard the drive from use or contact an expert to help you further.
In the Erase sheet there is also a button labeled Security Options. Clicking on this option opens up an additional sheet that has further settings for wiping the drive in a secure manner. These are most appropriate for when you are needing to format a hard drive and don't want any of the data to be recoverable. The default setting is for no extra security steps to be taken.

Why Would I Need to Perform a Secure Erase?
When you erase a file from a drive you don't actually remove the file itself, instead you remove that file's reference in the 'Index' of files on the System. This tells the OS that the space taken by that file is now available for use. The file is still stored on the drive until it is overwritten with other data. This means that special software can crawl through the drive and recover files that are still there. To more securely erase the file it needs to be over-written. Thats what the security options of the erase sheet are for.
Secure Erase on an SSD
Due to the way that an SSD manages it's blocks for rewrites the secure erase options are not available for this media type.
The Security Options slider lets you adjust the level to which you want to securely erase the drive from none to most secure. Please note that the more secure the erasure the longer it will take as it has to write data to every block of the drive multiple times, this can take a very long time especially with the large capacity drives that we have these days.

