The Mac has lots of little features built in to help boost your productivity, many of these help you with the organisation of your files. Although being organised isn't essential for using your computer, having logical routines certainly help with keeping you sane when you can't find the presentation you have been working on for the last few days, minutes before you have to show it! Below are several helpful tips to get you on track with being as efficient as possible.
1. New Folder with Selection
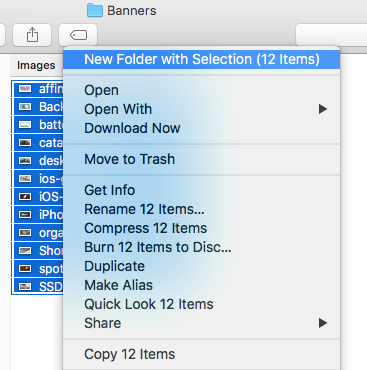
Whenever you make a selection of files in the finder if you right click the first option in the contextual menu is New Folder with selection - it does exactly as it says on the tin - it will create a new folder and put the files you have selected inside it.

2. Tags
Tags allow you to flag a file with a particular colour, but it does more then just highlight it with that colour. You can use the tags in the side bar to list all of the files that have been given a specific tag, and can even use them as criteria in Smart Folders. There is plenty of customisation so if you want a tag for a specific task such as ‘Great Recipes’ you can. Simply go to the preferences in the finder and click on ‘Tags’ to manage the tags that are in use on your system. To assign a Tag, right click the folder and choose the tag you wish to assign from the contextual menu.

3. Smart Folders
Smart folders allow you to see all files on the system that match a specified search criteria. They can be as complex or as simple as you like. For instance you could create a Smart Folder that finds all files that were created last month, with a tag of Red that have "Sam" in the name, or simply all image files that were edited this week. The thing to remember is that Smart folders do not relocate the files on your hard drive, they just give you another way to view them, meaning if a file meets the criteria of one or more Smart Folders it will be visible in it's results. To create a Smart Folder click on File>New Smart Folder when in the finder or type into the search field of an open Finder window and click Save.

4. Finder Sidebar
The Finder sidebar allows you to quickly and easily navigate to locations. The Favorites section is customiseable in two ways. Firstly you can drag a folder from anywhere in the finder to the sidebar which will create a shortcut to it that is available in every finder window. Secondly if you navigate to Finder>Preferences from the menus you will be presented with the Finder preferences which has a section for the sidebar. Here you will find a long list of items that you can make visible, simply tick the ones you wish to see.

5. Stacks
New with 10.14 Mojave was stacks, which allows you to hide away any clutter that is currently on your desktop by dynamically allocating the various files to a stack based on a criteria of your choosing. The default is Kind - a group of like files (photos, movies, music etc.). Clicking on a stack will reveal all of the files that are being ‘tidied’ away in it.

Folder Organisation
By default Mac user accounts have a selection of folders that are for specific purposes such as Movies, Pictures and Documents. You should consider storing relevant files in these places in order to make finding them later an easier proposition. I would go a step further and urge you to organise inside of these default folders with folders of your own to make a logical folder structure that makes it easy to follow at any point in the future.

