Apple's Mail app has a lot of built in functionality and many of us only scratch the surface of the available features. One really useful feature is Signatures which allows you to automatically attach a signature to the end of your email when composing, but how exactly do you configure it? In this blog article we take a look at how to use the Signature system as well as diving deeper into making truly custom signatures with a little bit of coding.
Apple’s Signature System built into the Mail app is very powerful and allows you to configure as many signatures as you want and assign them to as many email address as you specify. That way you can assign a different signature to your business email and your personal email or have an alternating signature for every email you send.
Signatures can contain text, links and images but it’s not always easy to work out how exactly to format the signature to your liking. Follow along below for a comprehensive guide to creating and styling the signatures or watch the short video to see a visual explanation of the steps and options available.
Creating and Organising Signatures
To access the Signature configuration panel go to 'Mail > Preferences' or type the shortcut '⌘ + , (Command + ,)' and select the signatures tab of the resulting window.
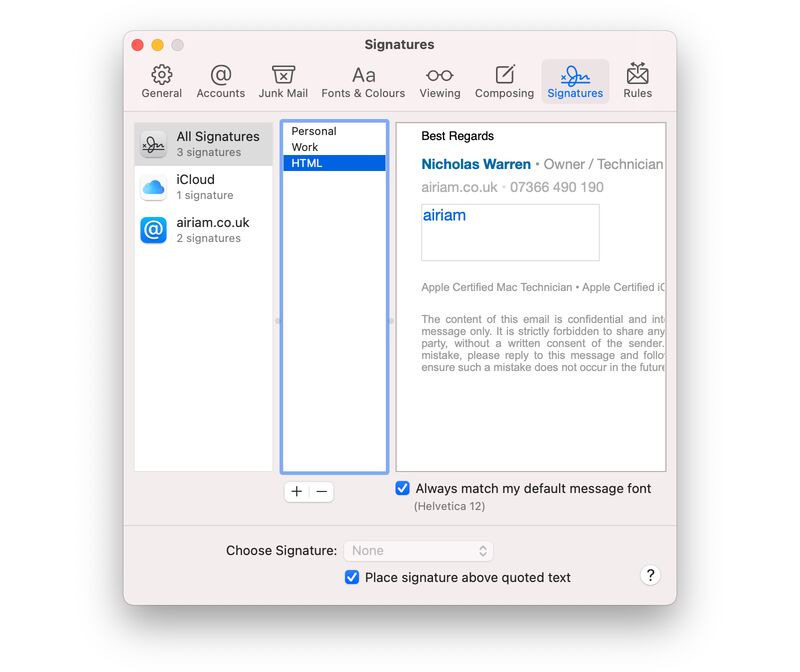
The signature configuration panel consists of three columns. The first is a list of all the available email accounts in the mail app. The second column is a list of the signatures that are available for use in the selected account on the left. The final column is the signature edit window, which allows you to format text, links and images.
 The Mail Signature Pane in Mail's preferences.
Add a Signature
You can create a signature for a given address by selecting the address you wish to add the signature to from the column of accounts and clicking the plus button at the bottom of the signature column. If you choose ‘All Signatures’ it shows you all of the signatures that are on the system, however a signature needs to be assigned to an account to be able to be used. You do this by dragging it from the 'All Signatures' list to the account name you wish to assign it to.
Rename a Signature
To rename a signature double click it in the list and type the name you wish to use. We recommend something descriptive so that you can easily identify the signature and to which address it belongs. Please note that a signature can be assigned to multiple addresses so you need only create it once.
Delete a Signature
To delete a signature, choose it from the list and click the minus button at the bottom of the signature column. It will immediately be deleted from all accounts to which it is assigned. There is no way to retrieve a deleted signature (unless you have a current Time Machine back up) so please be sure that you have the correct signature selected and that you definitely want to delete it before proceeding with this step.
Editing a Signature
Once you have created and named your signature, you can format it to say exactly what you would like it to. This is also a good place to have any confidentiality statements so please think about the exact content you require before placing it in the signature. You have access to all the usual format options for editing text such as font, size, copy and paste. You can use the tools under the 'Edit menu' or use their applicable shortcuts. For instance if you wish to insert a link choose 'Edit > Add Link' or use the shortcut ‘⌘ + K (Command + K)’. The link popover appears which allows you to configure it.
Adding a Reply To Email Address Link
If you wish to have an email address in your signature that, when clicked, will open a new email with an email address already populated in the ‘To’ field, then write your link in the form mailto:email@address.com i.e mailto:info@airiam.co.uk.
If you wish to change the size, colour and font of the text then use the font formatting palette which is accessible from the 'Format > Show Fonts' menu option or use the shortcut ‘⌘ + T (Command + T)’.
Images can be dragged and dropped into place so that they are visible in your signature. Mail will treat these as an attachment and you can configure them to be viewed either as the image itself or as an icon by right clicking on the image and selecting the appropriate option.
Image Size in Signatures
It’s worth making sure that your image size is correct to send with your email. Not only do you want to make sure that it fits within the sending limit of your email provider, but you also don’t want it to display a full size 1200px image when sending, which it will do when attached to your email. Our recommendation would be 100 to 300 pixels in width.
Auto Configuring an Email Signature
You can choose the signature you would like to add from the signature drop down that appears on emails with one or more signatures configured. You can, however, have mail automatically apply the signature to the email so that you don’t have to.
Access the Signature Configuration pane and select the address you wish to configure from the Account column. In the 'Choose Signature' drop down at the bottom of the page, choose the signature that you would like this email account to use. If you have more than one signature applied then you can choose the option for Mail to pick a random one, or work through them in sequential order. If you wish to have no signature auto configured, select ‘none’.
iCloud and Mail Signatures
If your email address is an Apple provided one (@iCloud.com) then your signatures will be synced via iCloud and available on all devices that are using the Mail app and signed into your iCloud account.
Full HTML Signatures in Apple Mail
If you can’t achieve the desired format for your signature, such as adding links to images or having content horizontally aligned, then you can create your signature using HTML. This method does require a little but of extra work so a good working knowledge of MacOS and HTML would be desired before proceeding. If you would like us to create the html for the signature then please get in touch.
Create an HTML Signature in Apple Mail
- Create a signature using the method described above and quit mail.
- Navigate to the Signatures folder in your account Library (e.g. ~/Library/Mail/V9/MailData/Signatures).
- Identify the signature file. It will have a .mailsignature file extension.
- Launch it in the text edit of your choice.
- Replace everything in the tag with your custom html.
- Save the file.
- Relaunch Mail and configure your email to use your new signature.
Signatures in iOS/iPadOS
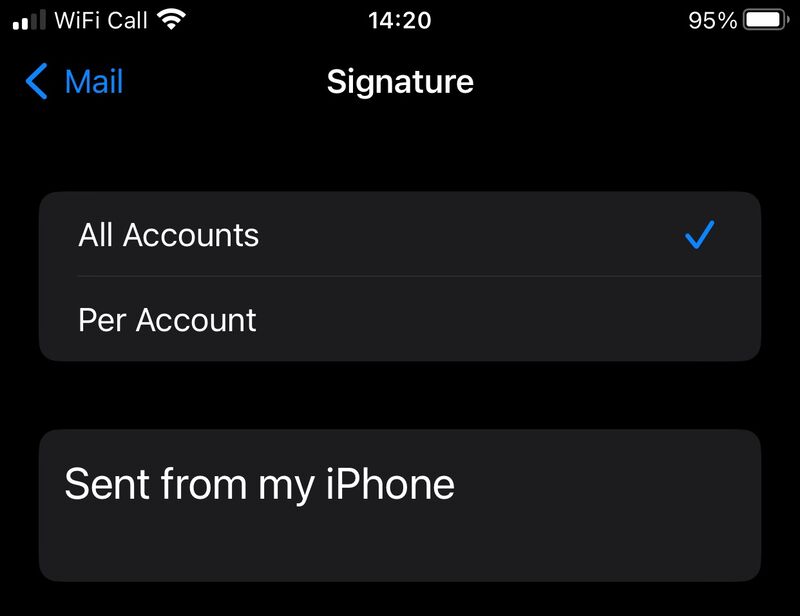
 The Mail Signature settings on iOS.
It's possible to create sigantures on your iOS device as well. The options are however much more limited than on MacOS. To create the signature on iOS follow the steps below:
- Navigate to 'Settings > Mail > Signature'
- Choose either 'All Accounts' or 'Per Account' to be able to create a signature for every account you use or an individual signature for each account you have.
- Tap in the relevant box and change from the default 'Sent from my iPhone' by typing the details you wish your signature to contain.
HTML Signatures on iOS
It is possible to use an HTML signature on iOS, but you can't directly input it as you can on MacOS. In order to have a full HTML signature email it to yourself from your Mac with the signature you wish to use. Open the email on your iPhone or iPad and copy the signature portion from it. Next navigate to the siganture section in Settings and paste it into the relevant box.

